The Blog
Unions Part 1: Stagehands, Crew, And Designers
Workers across Broadway, Off-Broadway, and Regional theatre are represented by various unions, covering everyone from the front-of-house staff, designers, stagehands, and actors to the director. These unions work to maintain equitable pay, safety and protections, and benefits for their membership through collective bargaining agreements with the producers and owners of theaters.
For newcomers to the industry, learning and understanding the jurisdictions and roles of each union can be a daunting task. But if you want to work on Broadway, becoming a part of a union is not only encouraged, it's often a requirement. For this reason, it's essential to have at least a baseline understanding of our different unions, not only when it comes time to consider joining but also in understanding your peers and co-workers' roles as well.
Below is a brief overview of the unions representing stagehands, designers and crew. The details of their jurisdictions and contracts are beyond the scope of this post, but more information may be found on their linked websites.
The League(s)

Before diving into each union, it's worth knowing who represents the theaters and producers they negotiate with. These "Leagues" act as dealing collectives or trade associations. Each union may have a different set of contracts for each League.
The Broadway & Off-Broadway Leagues
Founded in 1930, The Broadway League, as the name suggests, comprises producers, owners, general managers, and suppliers on Broadway and related tours. Their membership includes all of the For-Profit theaters on Broadway, including the Shubert Organization, The Nederlanders, Jujamcyn, and ATG.
The Off-Broadway League, in turn, represents 26 companies and theaters composing Off-Broadway. They were founded in 1959.
The League of Resident Theaters
More commonly referred to as LORT, it is the most prominent associate of theaters in the United States. Originally composed of 26 theaters at its 1966 founding, they now comprise 75 Regional theaters across 29 States and D.C. This membership also includes the 4 Not-For-Profit Theater companies on Broadway: Lincoln Center, Second Stage, Manhattan Theater Club, and Roundabout. Theaters fall under a letter grade (A - D) to further distinguish their membership based on box office sales totals. A special designation of A+ is given to the non-profit Broadway houses.
I.A.T.S.E.
The International Alliance of Theatrical Stage Employees, (Deep Breath) Moving Picture Technicians, Artists and Allied Crafts of the United States, Its Territories and Canada, better known as IATSE — or just "The IA" or “The International”— is the largest union representing theatrical workers.
The union was founded as the Theatrical Protective Union of New York (TPU) in 1886. By 1893, they were joined by stagehand unions in 10 other cities to found NATSE, the National Alliance of Theatrical Stage Employees. They Became INTERnational when Canadian locals joined in 1902. Each town or location was given a specific number and allowed to govern itself as a "local" of the union.
The union has grown to include designers, wardrobe crew, makeup and hairstylists, press agents, managers, and ushers. Traditionally, the locals were designated by location, but today, it has expanded to also delineate types of work and contracts.
Local One

TPU of New York, the founding union behind IATSE, was designated Local One in honor of its contribution. Local One represents all Broadway stagehands, including electricians, sound engineers, carpenters, riggers, video engineers, and special F.X. The union is most prevalent on Broadway, making up the majority of house crew and staff in the theaters. For those looking for a long-term career as a Broadway stagehand, Local One should be on your list of unions to consider. As of this writing, the bounds of Local One are also expanding to Off-Broadway theaters as more and more workers seek unionization.
It's important to note that you do not have to be Local One to accept Local One work, and consecutive work under Local One contracts is a popular way to eventually join the union. You may also apply through apprenticeship or gain affiliation through workplace organization. More info here.
ACT and “Pink Contracts”
The Associated Crafts & Technicians arm of IATSE also plays an essential role for Broadway stagehands. ACT card members do not belong to any specific local but instead are covered under the international itself. This allows ACT members to work under a "Pink Contract" (traditionally printed on pink paper) Pink Contract workers can work in union houses and on national tours through different locals but rather than being hired by the house, they are employed by the production, and travel with it in the case of a tour. Importantly, any member of a stagecraft local, such as Local One, can work under a pink contract if called for, this is not exclusive to ACT but rather, ACT membership facilitates working under a pink contract for those who are not already a member of a home local.
On Broadway, a number of pinks are negotiated independently for every show to compliment the Local One house positions both in the tech process (known as “advance pinks”) and some run of show crew.
Getting an ACT card requires accepting a pink contract, at which point you join and pay into IATSE.
Local 764 and Local 798
The wardrobe crew on Broadway is represented by Local 764, whose jurisdiction covers all theatres within a 50-mile radius of Columbus Circle, NYC, and Long Island. In 2010, the local expanded to include child guardians across several Broadway theaters.
Local 798 represents Make-Up-Artists and Hair Stylists across 22 East Coast states and Broadway.
Both locals accept applications through their websites, Local 764 and Local 798.
USA Local 829
Despite being founded in 1897, The United Scenic Artists of America didn't find its permanent home in IATSE until 1999. USA Local 829 represents all concentrations of designers, their assistants/associates, and scenic artists. They have collective bargaining agreements with Broadway, Off-Broadway, and LORT theaters. Though it represents all designers nationwide, committees are divided into regions: Eastern, Central, Western, and National.
Joining the union can be done through the Annual Exam and Portfolio review process, The off-Broadway Membership Candidate process, or by professional membership application if you have worked on a USA contract but have yet to become a member. More info from USA829 and OBADAG.
Just getting started
As you can tell, the landscape of unions in the theatre can be pretty complicated. Directors, Choreographers, Actors, Writers, and more will be covered in Part 2.
Have more questions about unions? Write me at owenmeadowsdesign@gmail.com, or feel free to comment below.
Owen

Software for Sound Designers

Software and tools for sound design are an important and contentious topic. Preferences aside, there are several valuable and mandatory pieces of kit that you will want to familiarize yourself with as you make a career in this industry.
A quick note: most of the programs we use are tailored for or exclusive to MacOS, and a show will unlikely run on anything else.
Sound Effects

Qlab
Qlab is the workhorse of our sound effects. You'd be hard-pressed to find a show on Broadway that doesn't rely on Qlab, for that matter, on any show anywhere. Qlab allows simple sound file playback, more complicated cueing structures, automation, interfacing, and more. If you only learn one program on the list, it should be this one.
Cost: Free basic version with professional licenses starting at $249
Canvas
Currently, in beta, Canvas is a new and innovative take on playback and show control. Incorporating an element-based programming structure, Canvas allows for incredibly unique and complex designs. You can explore and join their beta here to get a complete list of what Canvas can do.
Digital Audio Workstations
The choice of DAW is far more than I can cover here, but below are the most common, and you can't go wrong with any of them.

Pro Tools
Avid's Pro Tools is the standard DAW for most designers and music producers. It's been the industry standard since its release in 1989. I find it most useful for live recording, music production, and long-form audio content. Even if this isn't your preference, it's worth learning the basics of Pro Tools; chances are you'll have to work with it at some point in your career.
Cost: Free basic version with professional subscriptions ranging from $10 - $100 a month
Logic Pro
Apple's Logic Pro fits the niche of an inexpensive yet powerful DAW. It's a favorite of musicians, composers, and sound designers. Logic feels slick and simplifies designing exciting and unique effects, even using its standard plugins and sample library. Logic Pro is my personal favorite for creating sound effects and writing compositions.
Cost: $199.99 for a perpetual license
Ableton Live
Electronic musicians, producers, and composers adore part DAW, part instrument, Ableton Live. Ableton's focus on live music production and electronic production is unmatched. Our industry often uses it for more complex sound effect cueing or generating click tracks for pit musicians.
Cost: $99 basic version ranging to $749 full license suite
Drafting

Vectorworks
A necessary evil, Vectorworks is the industry standard drafting tool. We use it to draft speaker plots, signal flows, rack drawings, layouts, plans, and dimensions. Vectorworks is also a favorite of lighting designers. Designers will spend countless hours drafting and redrafting as plots get passed back and forth. The Spotlight extension is mandatory for our line of work. For those who prefer Vectorworks signal flows, ConnectCAD is worth being considered.
Cost: Spotlight Subscriptions from $153/month or $1530/year
AutoCAD
Where sound and lighting designers prefer VectorWorks for their drafting, scenic designers and technical directors often prefer AutoCAD. The primary difference is its workflow and slightly fewer resources for sound and lighting AutoCAD. The scope of differences is beyond this article. However, AutoCAD may be more difficult, so experiment with both to find your preference.
Cost: Subsection model at $245/month or $1,955/year, as well as a unique "Flex" option.
OmniGraffle
What OmniGraffle lacks in precision and depth, it makes up for in design and speed. OmniGraffle is a fantastic (and relatively cheap) drafting kit perfect for signal flows and rack drawings. Its stencil and magnet concept makes doing repetitive tasks and complicated diagrams a breeze. I personally use OmniGraffle for all of my signal flow drawings. In a pinch, OmniGraffle can also compete with its more expensive competitors on plots and dimensions.
Cost: Standard License $159, Pro License $249 or annual subscription of $124.99
Paperwork

Excel (or Google Sheets)
Spreadsheets spreadsheets and more spreadsheets. This one doesn't need explaining, but you will spend much time making and looking at tables, charts, and lists. Without them is chaos. Whatever you or your team uses, it's worth knowing some valuable formulas and formatting.
Cost: Office 360: $69.99/year
Filemaker Pro
Every sound system is a bespoke creation, and keeping track of everything, from the lists to the labels, is no easy task. Many in our industry have devised unique solutions through relational databases and Filemaker Pro. Filemaker Pro has allowed people to create custom software to help us track our shows and systems. From Kai Harada's Show Tracker to Daniel Lundberg's Minotaur and more, these Database software are core to the work of associates and production audios. Having a Filemaker license to use these solutions may not be necessary. Still, the more you use Filemaker, the better you will understand the power of what people have created for our use.
Cost: Perpetual Individual License $594
Honorable Mentions

Rogue Amoeba Suite
Rogue Amoeba's software will inevitably solve some problems you didn't know you had. From the internal routing capabilities of Loopback to the app recording of Audio Hijack and the core audio management of Sound Source, I use one of their products almost daily. While they are not directly useful for work in the theatre, having them on hand can be a Swiss army knife in your back pocket.
Cost: Prices range per software; explore their site for more detail.
Iced Audiofinder and Soundminer
As you start to amass a collection of sound effects, it can be tedious to dig through thousands and thousands of files to find the exact bird chirp or police siren. The best solution is an audio file and metadata library manager. Both Soundminer and AudioFinder categorize, sort, and log all your files and make them easy to find and search using metadata, tags, and more. Beyond library management, they can help you edit and tailor your files within the program before shipping them off into your DAW for final touches.
Cost: Iced AudioFinder $79.95, Soundminer starting at $199
Splice and CoSo
Splice and CoSo are my secret music composition weapons. Building on the endless sample library on Splice, CoSo allows you to quickly and effortlessly build loops and basic compositions with just swipes and taps. CoSo is my starting place for building any electronic composition
Cost: Subscriptions starting at 12.99/month
Wrap Up:
Got questions about software or want more suggestions (maybe a part 2?) Leave a comment below or email me at: OwenMeadowsDesign@gmail.com
Owen
The Shop Build
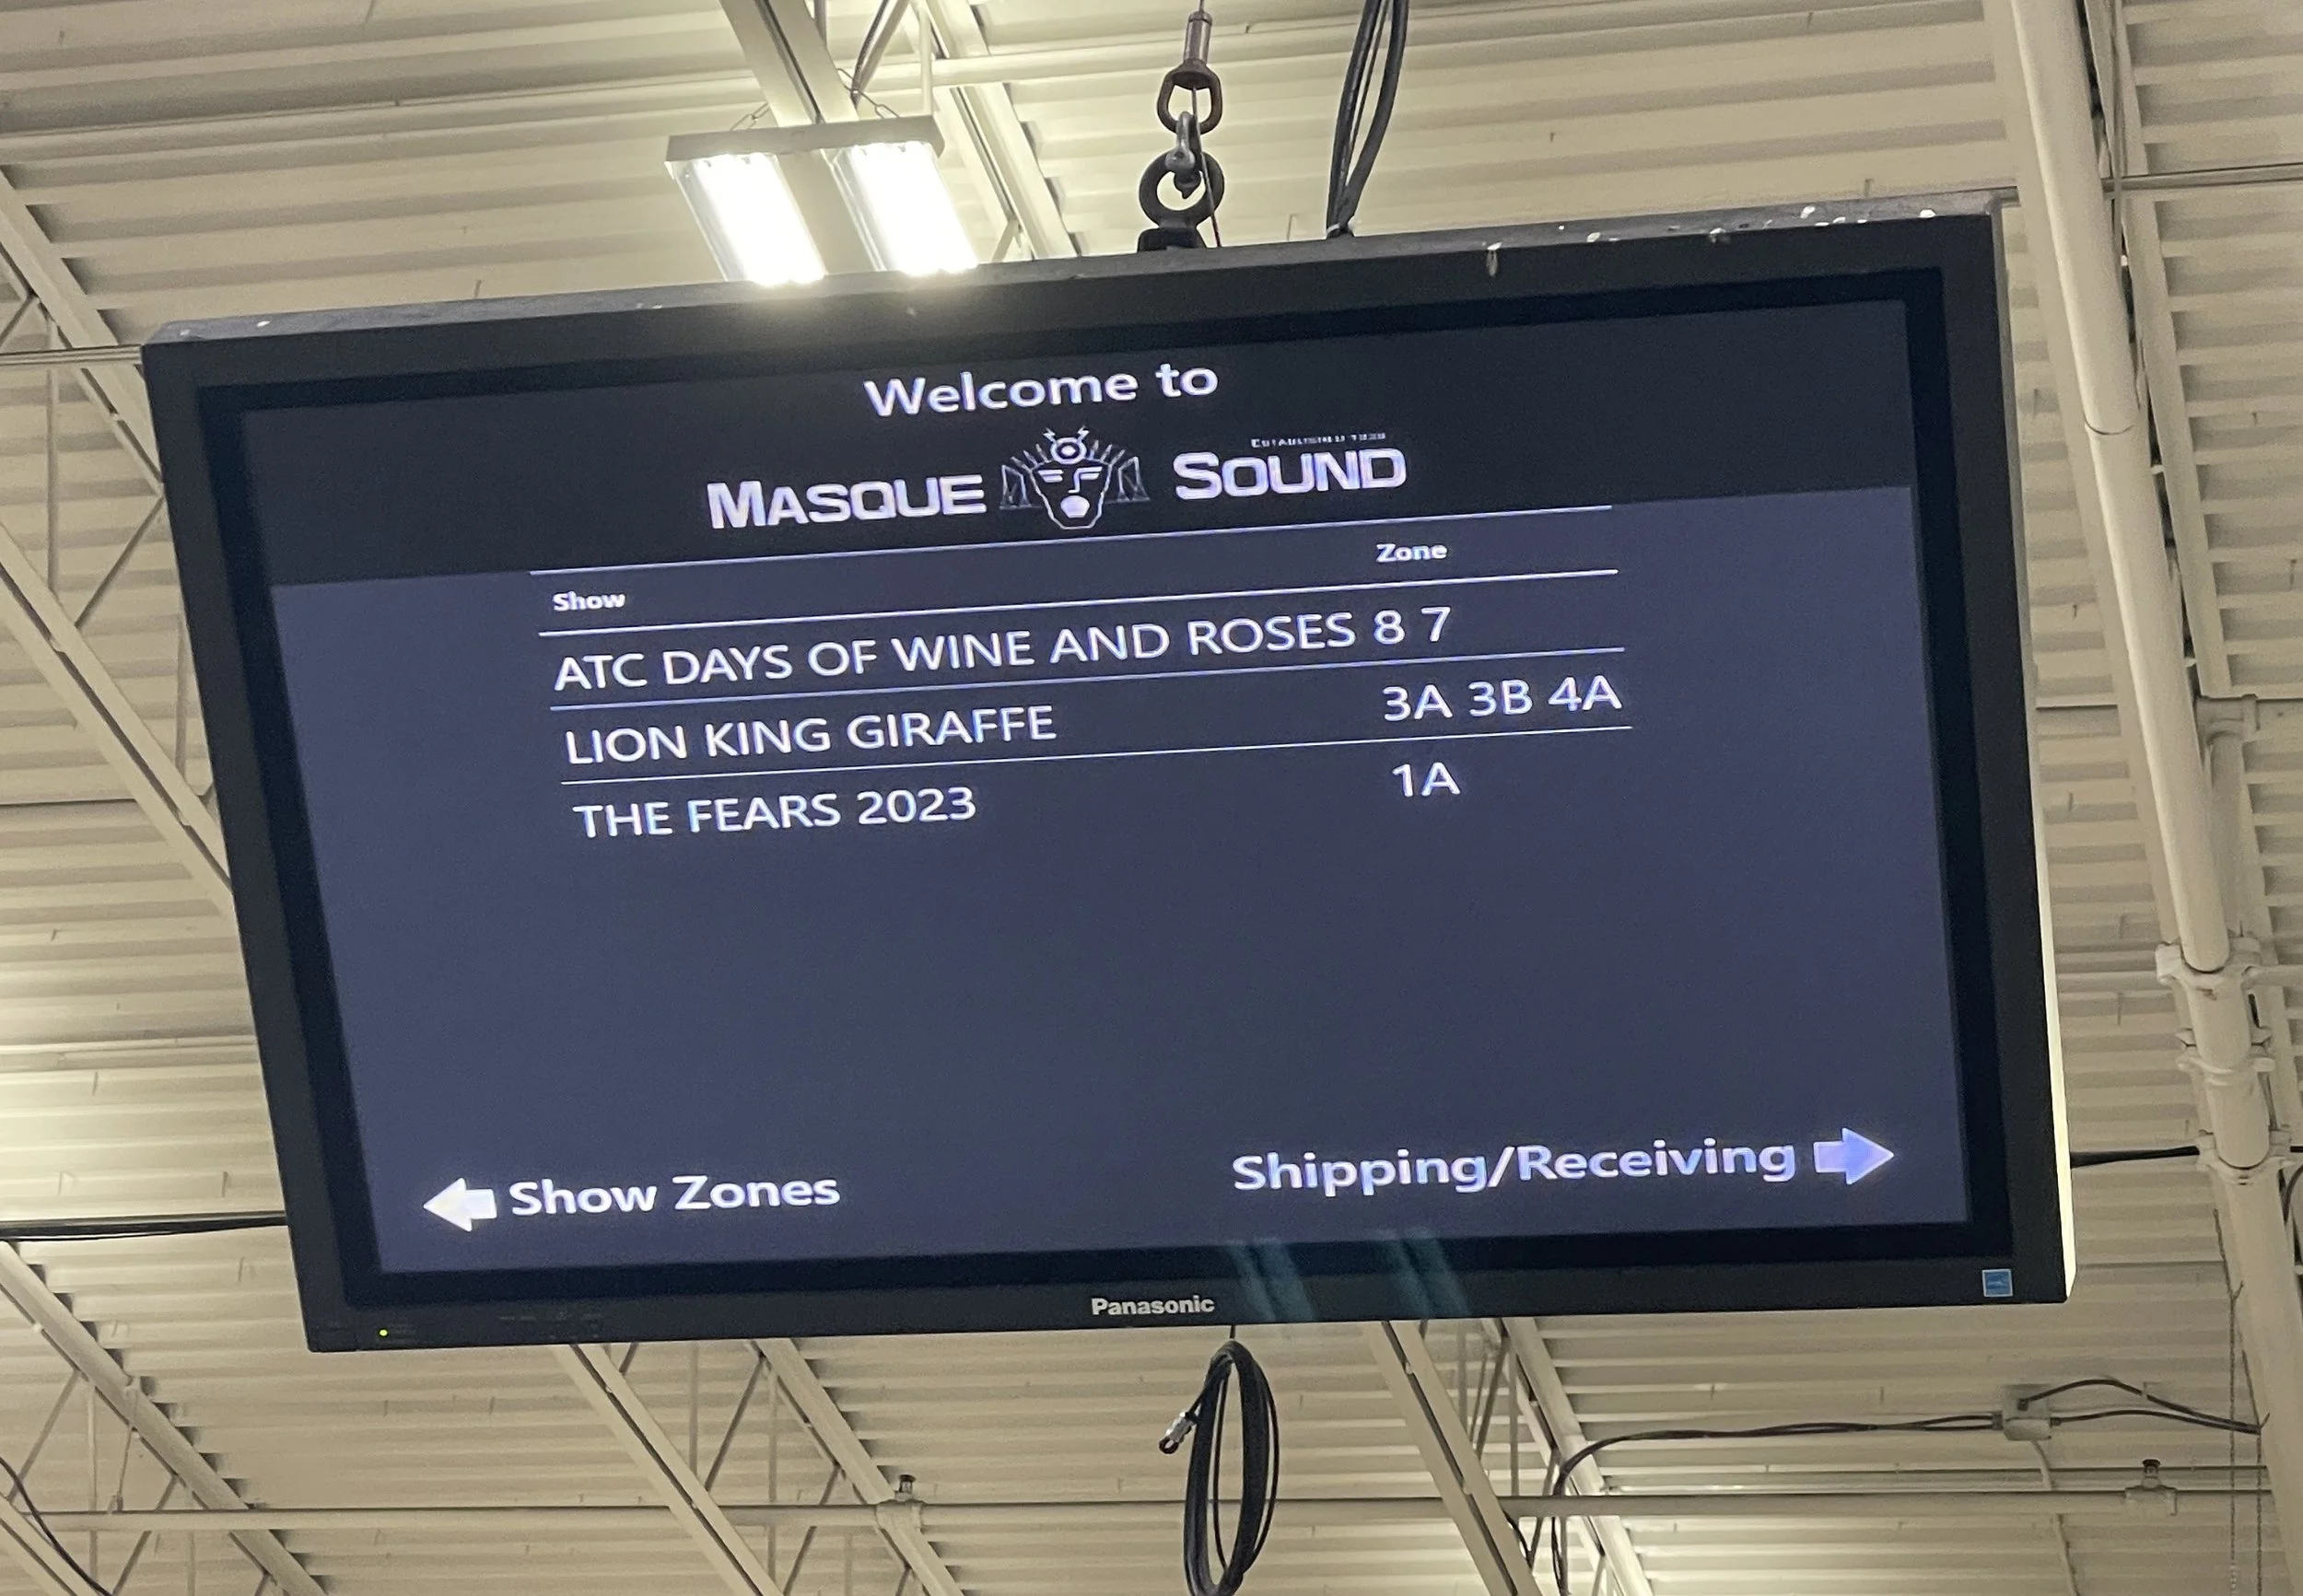
The welcome board at Masque Sound displaying each show and their build zone. Taken during shop prep for Days of Wine and Roses at the Atlantic Theater Company.
One of the central parts of any New York or large regional show is the "Shop Prep," an essential step in the production when the sound system comes together.
The name "Shop Build" refers to the various rental shops from which shows rent their equipment for the duration of their Broadway stint, tour, or out-of-town experience. In essence, the shop build is when the sound team works with the rental shop to acquire, assemble, test, and ship all of the equipment used in the production. The build can take a few days for a small workshop to multiple weeks for a Broadway musical or national tour. The process follows the same steps regardless of the show or the shop.
Equipment Bid and Preparation
Three leading sound rental shops in the New York area provide equipment for Broadway and large regional productions. Sound Associates, Production Rental Group (PRG), And Masque Sound and Recording (the last two are technically in New Jersey). The process starts with an initial bid where each shop quotes a cost for the desired rental equipment chosen by the designer. This may include substitutions for equipment that may not be available. How a production chooses which shop to work with is beyond this post, but once a shop is selected, the sound team will move on to paperwork and preparation.
Preparation includes making any necessary substitutions for equipment, submitting lists for cable, and coordinating any additional needs that come up as the production moves forward. All of this is done with an assigned project manager from the shop who will oversee your rental for the duration of your build and beyond. Once the length and dates of the build are booked with the shop, the sound team, typically the production audio, will coordinate the labor that will help assemble the show with the production staff and design team at the shop.
Getting To Know The Shop
There is much to know about how a shop functions and what to expect from your first few days. The first and most important things to know are your "Zone" and "Captain."
Your zone is the area of the shop that you will prep in. This is where your equipment will be delivered, and all the work will happen. Shops will divide their zones between as many shows as they have prepping at a given time. The shop captain (sometimes called "key") is the shop staff assigned to your production and zone. They help retrieve equipment, manage inventory, and ensure you have everything. They are your direct line of communication for any questions or requests. Sometimes a captain may be assigned to more than one zone. Your show captain is vital to the success of your build, so make sure to treat them well and respect their time. It's best to make requests with detailed lists and quantities before you send them running back and forth for every bit of gear you may be missing.
The different quirks and staff departments around the shop are also worth knowing. Each shop does things slightly differently, has a different inventory, and even other cable types. The differences are many so ask questions and rely on your captains and production team to help you. As for staff, each shop divides its equipment or services into different departments; these departments may comprise one person or a group of people who specialize in something. Typically you will find computers, manufacturing, radio frequency (RF), console departments, and many others specific to each shop. Try to get to know each department's members; they are often great resources in solving problems on your build.
The Build
Your first time working in a shop build can be intimidating for newcomers. The prep process may be rushed and rag-tag or slow and methodical, but in either case, the process centers around some fundamental pillars of how a show is put together.
Bundles and Tails
Before shop prep, the associate designer and production audio will have sketched the sound system and prepared the paperwork for all the cables interconnecting the show. The first task is bundling that cable.
Bundles

A Sound Design Tech table containing 6 cables. flagged ends are marked with green gaff tape
A bundle -- sometimes called a "loom" in other parts of the country-- is a group of cables attached with friction tape to mimic a single cable. This makes for easier runs and better organization during load-in. When making a bundle, you'll typically be given a "bundle sheet" listing the bundle's contents and corresponding cable labels. The bundle sheet lists each cable's source, destination, and "flagged" end. One end of each cable is wrapped with colored gaff tape according to the sheet. This "flag" tells the person bundling the cable which end of each cable is grouped together in the bundle -- all flags on one side. When gathered, it can be bundled and checked off the list. Some shops will bundle your cable using shop staff, but you may have to bundle your own others.

A 9-Pair Male XLR Mult tail
Mult and Tails
Connecting all the equipment for a show takes a lot of cable and many bundles. The core audio cable we use is the multi-cable. A multi-cable or "Mult" carries multiple audio signals in a tight and compact package. In New York, you will usually find Wireworks G-Block multi-cable in various combinations from 3-Pair (3 lines) up to 19-Pair (19 lines). Each end of the mult is a set of "tails" These are the individual connections (usually XLR) in each multi-cable. Tails can vary from "fan" style single XLR cables to multi-port stage boxes or rack-mountable panels. Each shop varies in the type and style of mult they carry, but they all accomplish the same goal. In any case, shows contain hundreds of tail sets that must be labeled and accounted for during the shop prep.
Racks
With cable dealt with, it's time to tackle equipment racks. Each piece of gear on a show is installed into racks throughout the theatre, from front of house to backstage, booths, grids, and more. When you first build a rack, it's helpful to understand their unique measurements and styles.

The install racks for Griswolds Broadway Vacation. Taken at the 5th Avenue Theatre, Seattle
Equipment racks come in a few different styles that are useful for different scenarios. The first and most used is the "Rack Insert" These racks are typically smaller and built from plywood with a set of rails on the front and back. They come with matching "surrounds" -- road cases -- for transport. You usually find "Install" or "MRK" racks for heavier-duty or more complicated builds. These racks are built from steel and come in larger sizes, are deeper than inserts, and have front, back, and middle mounting rails that can be adjusted. You may also see the occasional "double wide" install rack.
The many different styles and sizes of audio racks may be intimidating to sort through initially. Still, they are all based on the simple industry standard "rack units" (abbreviated to RU or just U). One RU equals 1.75 inches, and all rack equipment is built in multiples of this measurement. So a 3RU rack drawer is a drawer that takes up 3 rack unit spaces. Similarly, a 16U rack insert has 16 rack units worth of space.
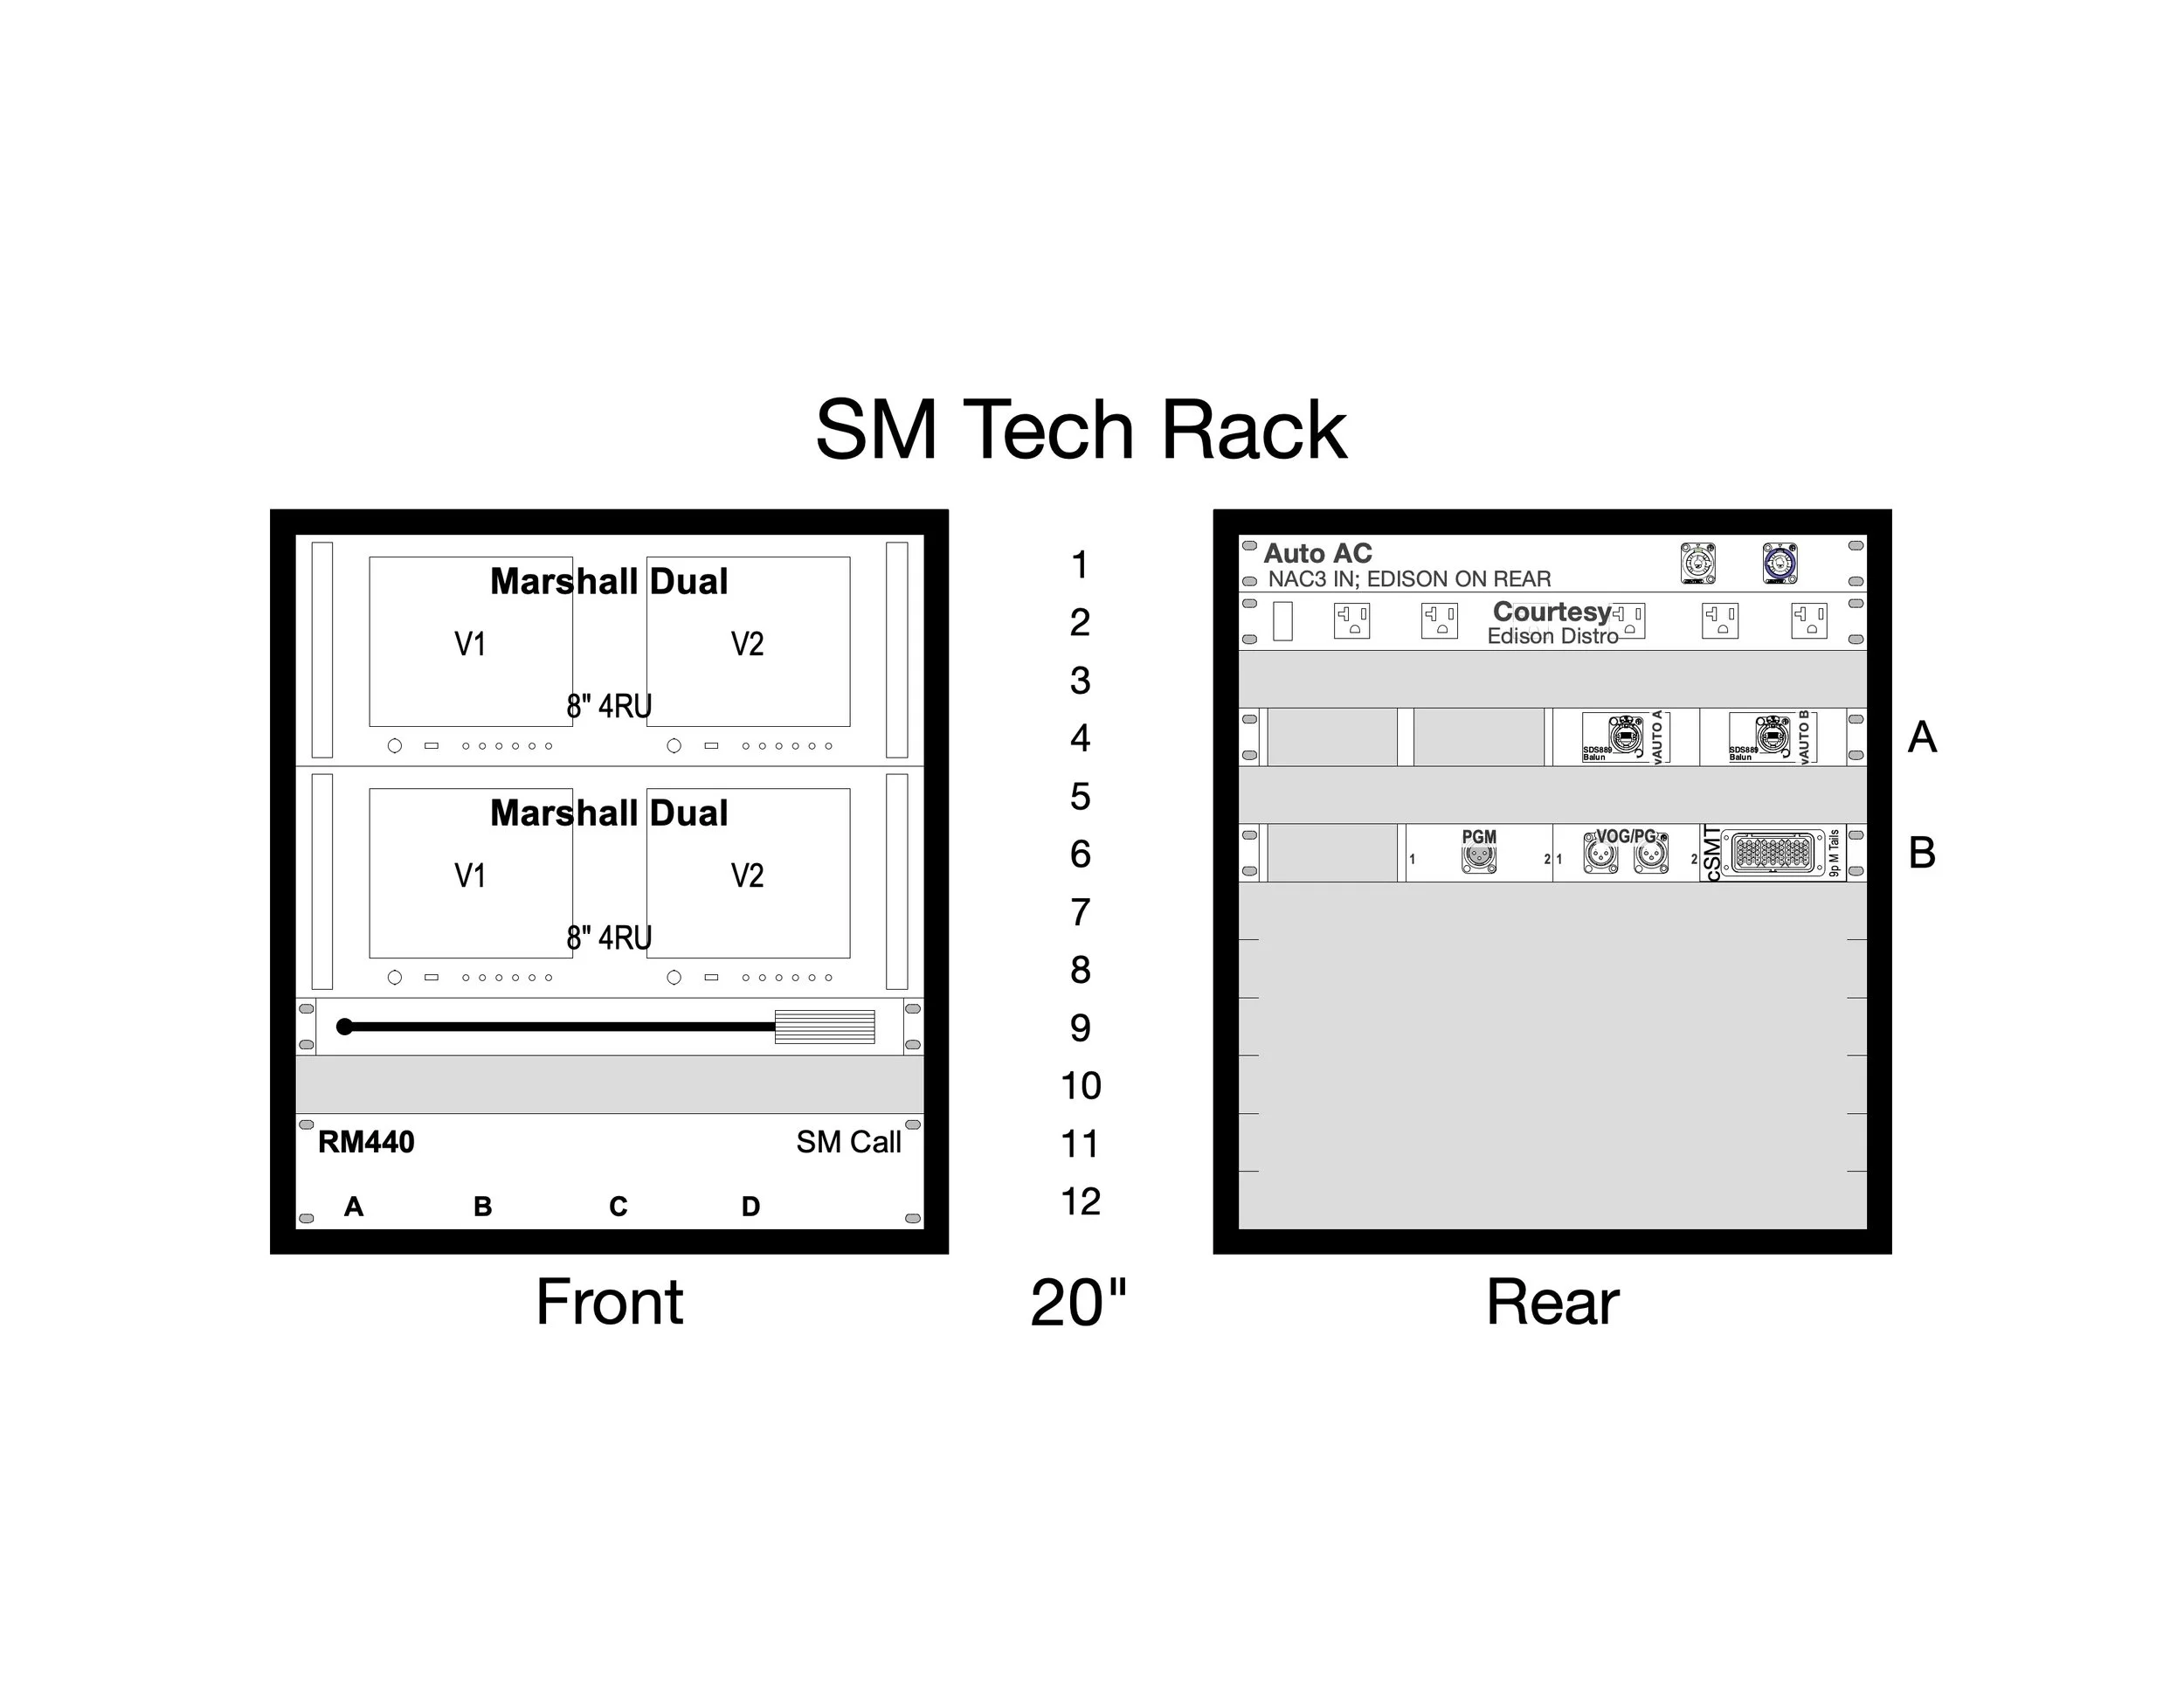
A drawing of an SM Tech Rack with Com and video. Stek Plates are detailed A and B
Rack Drawings
Building your first rack starts with the rack drawing. This drawing shows the layout of the rack as designed by the associate and the production audio. The paperwork shows the type and position of each piece of gear and may (or may not) come with a signal flow diagram of how it all gets connected. There may be some flexibility in the layout of the rack, but it's best to check with your team if you can make adjustments.
Stek Plates
When we connect a cable to a piece of equipment in a rack, it can be a hassle to get into the rack and plug a bundle into something like an amp or processor. To make things easier, connections coming into the rack typically go through "steks." A stek is a blank 1U panel that can be customized with plates of different connectors and pass-throughs, including mult tails. These are outlined in the rack drawings and connection accordingly. The stek panels are convenient patch points for bundles and cables when the system is installed.
Testing
Once cables and tails are done and racks have been built, it's time to assemble them for testing. While conditions in a shop are different than in the theatre, testing with a setup as close to show conditions as you can manage is vital. All the racks are placed together in groups as they would be in the space, front of house is set up with the console, and bundles are run out to their corresponding locations. Once wired up, every input, speaker, com, and video line should be tested and checked with their proper cabling. Doing this ahead of time in the shop help to catch anything that may have been missed while you still have time and space to fix things, as well as find any gear that might need to be fixed.
Pack and Push
The final step of the shop build is getting it all out the door. Racks inserts are put into their surrounds, Installed racks are covered and wheeled away, and every cable, speaker, and loose piece of equipment is packed into road cases. Every case and rack is labeled (sometimes gaff tape and Sharpie, sometimes fancy labels) with a number, its contents, and where in the theatre it should go during load-in. The production sound person often decides what goes in each box beforehand, and a detailed list is kept.
Once in boxes, you will either push them directly onto the trucks or stage them for the shop employees to end up in trucks later. The truck layout will be specifically laid out for tours or larger shows so that each case arrives in the proper order and is unloaded efficiently and safely. Smaller shows that can usually fit on a truck or two may be laxer about how you stage your cases.
When it's all said and done, your show zone should be empty, and boxes should be on their way to the theatre.
Wrap up
Congrats! You've just finished your first shop build. This process is core to the success of any show and very often the majority of work you will find in the city. It may be intimidating at first, but the process will be second nature after a few times.
If you have more questions about shop prep or want to hear more about rack building or other topics, comment below or email me at OwenMeadowsDesign@gmail.com.
Happy building!
Owen

The Ears of Broadway - A Who's Who of Sound Teams

The sound team for Hercules at Papermill Playhouse. From left to right, Ian Carr (Production), Owen Meadows (Associate), Kai Harada (Sound Designer), Ashton Mcwhirter (A1).
The best way to understand the world of Broadway sound is to start with a look at the people who make it happen. Unlike smaller community or regional theatre's where one sound person has multiple responsibilities, the sound of a New York show is the culmination of many audio people, all with particular skills and duties. While some hierarchy does exist, teams generally work together to get a show on its feet. Every team in every production functions with its own rules and delegation, but this is a general overview of who you'll see credited on a Broadway show.
The Sound Designer
The Sound Designer is the creative mastermind of the team. They are responsible for the entire aural environment of the show. This means designing an effective sound system and sound effects and, in some cases, even helping to manage the acoustic properties of the theatre itself. The designer works with the director, music team, and other departments to determine the content and needs of the show's sound. Based on this, they will design their system, including speaker placement, microphones for musicians and actors, and any other unique needs of the show. Each designer has their own distinct style. Some are composers or more content-focused, while others specialize in system design and supporting the natural sound of the actors and musicians. Though each designer is different, their work is always in service of the collective vision of the show.
The Associate
The Associate Designer sits right in the middle of the audio team; they are as much an ambassador as they are a secretary. Their primary responsibility is to take the designer's system and distill it into its parts and determine how it gets put together. The associate will also design video and communication systems between all departments. This means generating paperwork detailing the designed speaker positions, equipment rack layouts, and the miles of cable that keep it all connected. This requires a good understanding of their designer's individual peculiarities, aesthetics and how they envision their system functioning. Because of this, most associates will regularly, if not exclusively, work for the same designer repeatedly. Beyond the system, the associate is there to help create sound effects and communicate with the other departments.
The Assistant
The assistant is an associate with less responsibility and less agency. Like the associate, they are responsible for generating paperwork and working with the designer on the system and sound effects. However, they typically have less oversight and agency to make decisions independently. They may pass important meeting questions or decisions to the designer or associate rather than decide on their behalf. Often they are responsible for keeping paperwork up to date, distributing documents, and aiding the associate and designer with whatever else they need. Most shows either hire an associate or an assistant, but as shows get bigger, hiring both is becoming more common.
Production Audio
aka Production Sound aka Production Sound Engineer
What the design team puts on paper, the Production Sound person makes a reality. Their primary job is to oversee and manage the installation of the sound system. This means taking what the designer and the associate have laid out on paper and determining how that can be achieved. They will plan rigging, manage labor and budgets, and oversee the installation of every cable, speaker, and rack. Their job is to ensure the system functions as the designer wants and achieves it on budget and time. They often work with the design team to determine the most effective way to interconnect the system or specify equipment for video and communications. Once loaded in, the production person will be in charge of maintaining the system and overseeing any equipment changes, adjustments, or replacements. A Production person may sometimes have an assistant, associate, or "advance" team that helps them share the workload.
A1
aka Audio 1 aka Head Sound aka Mixer
The A1 is probably the first person an audience member thinks of when you say "sound person" The A1 is responsible for operating the show night after night. "Operating" is different for every show, but typically it means mixing the actor microphones and band and taking sound effects. In tech, the designer and the A1 will develop the sound of the show; once opened, the A1 needs to be able to re-create that sound every night. Not only does that mean pushing faders the same way or taking the cues properly, but it also means adapting to the myriad changes night to night. Understudies, new musicians, and even the weather and size of the audience will change how a show sounds between performances. The A1 does their best to wrangle these factors and keep the show sounding as close as possible to the designer's original intention.
A2
aka Audio 2 aka Deck Audio
While the A1 takes care of things in the house during the show, the A2 (or multiple A2s) handles things backstage. Their primary responsibility is the wireless microphones during show conditions. During tech, the A2 will construct and maintain the custom rigs used to place microphones on the actors according to the designer's needs, whether in a wig, secured to the actor's ear, or even hidden in a beard or hat. During show runs, the A2 will test the microphones, get them to the actors, and monitor them during the performance. They will also assist the musicians with any issues that comes up in the pit. As the A1 is actively mixing the show, the A2 is the first person to help troubleshoot problems backstage. On longer-running shows, the A2 often trains on the mix as a substitute or stand in for the A1.
*If you want to learn more about the roles of A1 and A2 Adam Savage of Mythbusters did a great set of videos here and here featuring the team from Hamilton in San Francisco in 2020.
Recognition
With some rare exceptions, every show on Broadway comes to life with some combination of the roles above. It may be surprising that just a few sound people run mega-musicals eight times a week. Everyone has their particular skill set and job, and most go unnoticed in the grand scheme. If you want to learn more about Broadway sound, or start a career in the industry, start by recognizing the people who put it all together. You'll find most of their names in a small typeface at the back of the playbill. But don't be fooled; they are all integral to the success of every Broadway show.
Have questions about these roles or learn what it takes to make shows happen? Leave a comment below, or feel free to email me at owenmeadowsdesign@gmail.com
Owen
The College Portfolio Review

I'm taking a quick detour from my focus on professional sound design to focus on what is often the basis for many of our careers: college portfolio reviews.
As we approach the spring and college interview season, hundreds of theatre-minded high schoolers are preparing or diving into this dreaded interview. Much like an art student or an actor, theatre design and technology programs worldwide require students to present a portfolio of work to evaluate their skills and interests. This can be a dubious task for those used to community and high school theatre. What goes in a portfolio? What are they looking for? What if I haven't been documenting my work? In my summer work teaching high schoolers, I always get these questions. I also went through the same challenge when I applied to schools. After spending some time preparing students for their own portfolio reviews and speaking to college evaluators, here is what I recommend and what to prepare for.
What are they looking for?
Contrary to what you might think, the reviewers look for more than just the prettiest and most well-developed portfolio. They aren't even looking for those with the most experience. They are looking for a peek into your process and learning ability. One of the best things to remember when interviewing for a conservatory or theatre program is that their job is to teach and foster your skills. That means the most important thing is how receptive you are to learning and how your artistic and technical process fits in with what the school can offer you.
So how do you show that? I recommend focusing on process over product. Or process *to* product. Rather than stuffing your portfolio with perfect production photos and polished paperwork, showing the reviewers how you got to the final product for three to five of your works is more interesting. Giving the reviewers an idea of how you got from points A to B allows them to see how you create your work. Reviewers love to see concept ideas, notes, and even sketches. Toss a concept statement for your design or an initial illustration of your plot or set in your portfolio. Even a storyboard, inspirational photos, or music can be a good clue into your process. The goal is to give them a tour of your mind and see that you can clearly communicate your ideas and passions. Let them know how you got the idea for your work, the journey through the craft and structure to the final polished product.
But what if I don't have anything prepared?
It's a lot to expect high schoolers, who until recently thought of theatre as a hobby, to prepare a stack of paperwork and content to show to a panel of professors. Many students I speak with have yet to prepare or didn't know they had to prepare until they start applying to schools and have nothing ready. So what do you do? In this case, there are a couple things that can help you.
First, don't panic; I've seen plenty of students come into their reviews with hardly any productions under their belt who would go to be accepted and become talented designers. As I said, the reviewers are more interested in hearing how you work and communicate your ideas. So try to find things that help express that, even if it's not directly related. It could be personal photography or sketches, even digital art or pieces of writing, or anything you made that can show off your creative process and give them something to talk about.
Second, we'll keep this between us; you can fake it. If you didn't record, sketch, or do any paperwork for a show, go back and create something. This may seem disingenuous, but again, the goal is not perfection but communication. By faking it, you are also doing yourself the favor of reflecting on your process. If you don't have a concept statement or inspiration for one of your pieces, go back and find some. Chances are you had inspiration initially but couldn't place it at the time. Maybe you didn't make a plot or a drawing for a show; create one anyways. It's better to go back and show your process, even after the fact, than it is to worry about not preparing and producing anything. Faking it may even show you things about your process you didn't realize beforehand and help prepare you better for the review.
What happens in the room?
Every institution does portfolio reviews a little differently. Some sessions will be with one or two professors, while others might be a roundtable with the whole department. The latter is definitely more terrifying, but the process is more or less similar in either case.
The review is half about your work and half about you. Like any interview, it'll usually start with an introduction. The reviewers want to know about your background and your interests. Then you'll dive into the portfolio and resume. Expect them to ask a lot of questions about your work and what experience you may have. Be prepared to talk about your work, ideas, reactions, and how you have achieved your work so far. Don't be afraid, be honest, and have some fun with your review, it's good to give them an idea of your personality, and a light attitude can go a long way.
Once they've looked at your work, they'll likely want to see how you fit in with the college or program. You'll get questions like "Why are you interested in our school?" or "What are you hoping to get out of this program?" This is your chance to share your ambitions and goals. Be honest about what you are looking for in your education, and do your homework on what the program offers.
Once they've interviewed you, it's your chance to interview them. Remember that while they are trying to find the right students, you are trying to find the right school. Every interview allows you to ask questions about the program, and you should. Asking questions shows that you are interested and gives you a chance to hear directly from the professors about what they can offer you in education. Take the time to learn about the program, research beforehand, and come up with questions important to you.
Extra Help
Beyond the interview, a few things are worth doing once you make your first impression.
1. See if you can get a tour and/or meet more professors and students.
If you are doing your review in person, see if there's an opportunity to tour the school either with one of the professors (ideally in your concentration) or a current student. Sometimes schools will organize this for you, but it can't ever hurt to ask. It will show how interested you are and give you a chance to see more of the program's inner workings. If you can meet and connect with other students, ask them questions about their experience. Often, students will be more candid about the highs and lows of the program than the professors or the brochure.
2. Send a follow-up email
Send the professors who interviewed you a follow-up email. Be sure to thank them for their time and re-express your interest in the program.
Wrap Up
Whether you are doing one portfolio, or dozens, just remember that they are all interested in hearing your story. Let your story come through in your portfolio and be clear about what you are looking for and what they can offer. Take very opportunity to engage, listen, and learn from the process.
Need more advice or have questions about finding a program? You an feel free to reach out to me at my email: OwenMeadowsDesign@gmail.com
Enjoy the process, and good luck!
Owen

Welcome to the Blog
Shop prep of my current production - Hercules at Papermill Playhouse
I'm starting up my old website blog again, but this time with a little more purpose.
When I started this website, I intended it as a catalog and reflection of my work from 2019, when I first started exploring being a sound person in New York. Back then, I was just an intern away from school for a summer, trying to process what was, and would become, my career. Four years later, I'm a full-time freelancer working in New York City.
Today, most of my work is as an Associate Sound Designer, a role that —for better or worse — is scarce outside New York. Its a broad role, but in its most basic form the associate bears the brunt of things like paperwork, communication, and nitty gritty system specifications on behalf of the show’s Sound Designer. From rack drawings, to cabling, to assisting with sound effects, the associate knows the ins and outs of the sound design and its systems. The role is central to the function of the sound team and it's often the first job fresh college grads interested in sound design take when they move to the city. And yet, being an associate is the bulk of many careers for even seasoned sound designers.
And yet, I often tell people that almost everything I know about being an associate in New York I didn't learn at school. For the end-all-be-all of the American theatre world, Broadway — and New York City — operates so uniquely compared to the rest of the country. Everything we do, from how we talk about shows to how we build them, is so different to the rest of the world, and yet for the biggest stages, we make up only a tiny fraction of the theatre industry. So, few colleges have the resources, or even incentive, to teach students how things operate here, a tiny fraction of career possibilities, and the most extreme scales. Why teach your students about HD video or million-dollar sound systems when most regional theaters —or colleges— can't even afford them?
But that leaves us with a dilemma. In the wake of labor shortages, high show turnover, and a flood of post-pandemic creativity on the market, there is rarely an incubation period for those entering the industry. And there wasn't much of one before. Coupled with a lack of education in large-scale system design and broadway-niche, newcomers must scramble to fill the gaps or end up in the deep end.
So, how do we fill those gaps ahead of time? If it's sink or swim, how can we smooth this transition to the New York stages? One of the better ways is through internships and apprenticeships. Unfortunately, these opportunities are few and far between, and those that exist are frequently underpaid and inaccessible for many.
It happens, then, that we rely on those already seasoned in the industry to help us. One generation of associates must pass on their knowledge to the next. And so, the reason for this blog. In many ways, I want to create something I wish I had when I started: a place to learn from and glance into the New York sound industry from someone who is also learning as they go.
I don't know what form this will take—some mix of technical concepts, methods, and reflections. At the very least, this can serve as a catalog of what I think might be valuable for someone coming up and deciding if this is the path for them. If some topics or questions might be of interest, I'm open to exploring them all.
In the meantime, you can check out my bookshelf, where I catalog books in and out of the industry that I have found helpful for my career. And you can keep a lookout for more posts as they come.